You can sign in to iCloud account to download data stored there using the iCloud Authentication token.
To get an Authentication token to iCloud, you will need an Elcomsoft Apple Token Extractor for macOS. This tool is shipped together with EPB (atex.dmg file). You can find it in EPB installation folder.
Elcomsoft Apple Token Extractor supports macOS versions up to 10.15.
EPB allows you to extract authentication tokens for:
▪Current iCloud user
▪Other iCloud user
▪User of a non-live operating system (e.g., by using disk image mounted to the current computer)
User permissions required for getting authentication token:
Authentication Token For |
Permissions Required |
iCloud account of the currently logged macOS user |
User's permissions are enough |
iCloud account of a different macOS user |
root permissions are required |
Types of authentication tokens extracted by EPB:
macOS lower 10.3 |
macOS 10.3 and higher |
|
Account with two-factor authentication |
Authentication token without limitations |
Authentication token with limitations |
Account without by two-factor authentication |
Authentication token for account without two-factor authentication |
Authentication token for account without two-factor authentication |
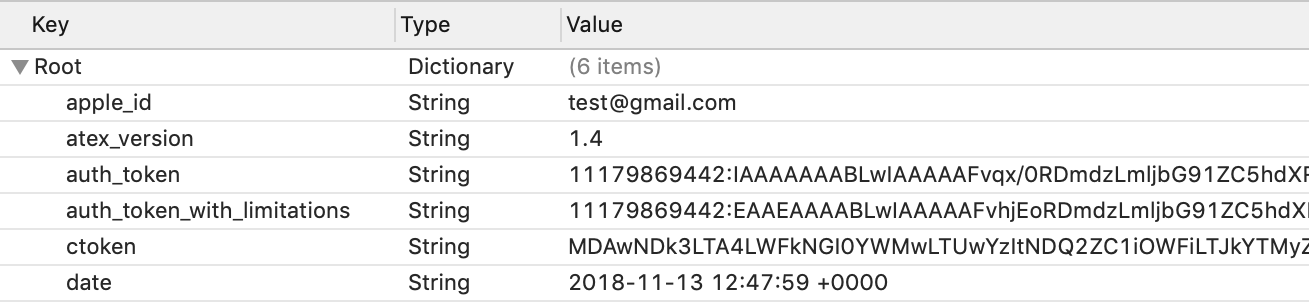
The "icloud_token_<timestamp>.plist" file, which is created as the result of the token extraction, might contain the following types of tokens:
Token Type |
Description |
auth_token |
Authentication token. Has no limitations. |
auth_token_with_limitations |
Authentication token with limitations. Has the following limitations: ▪The token cannot be used to download iCloud backups. ▪The token is valid only if it was extracted on the current computer and the user did not log out of iCloud. |
ctoken |
Continuation token. Cannot be used in EPB yet. |
To extract the Authentication token for the current iCloud user, do the following:
1. Run the atex.dmg file.
NOTE: If Elcomsoft Apple Token Extractor cannot be opened, see the detailed information in the Troubleshooting topic.
2. Copy the atex file from the mounted image to the folder where you want the file with authentication token to be saved.
3. Go to the directory where you saved the atex file.
4. Launch the atex file. The "icloud_token_<timestamp>.plist" file will be created in the Users/<current user name> directory.
You will see the full path to the created file in the opened Terminal window.
NOTE: Make sure that there is Internet connection on the computer where the token is extracted. Otherwise, only the token with limitations will be extracted.
5. The created "icloud_token_<timestamp>.plist" file contains the Authentication token of the current iCloud user.
The "icloud_token_<timestamp>.plist" file created for the current iCloud user contains the following information:
macOS Version |
Contents |
macOS up to 10.12.5 |
▪Apple ID (apple_id) ▪Authentication token (auth_token) ▪Continuation token (ctoken) ▪Password to Apple ID - in some cases |
macOS 10.3 and higher |
▪Apple ID (apple_id) ▪Authentication token (auth_token) ▪Authentication token with limitations (auth_token_with_limitations) ▪Continuation token (ctoken) ▪Password to Apple ID - in some cases |
To extract the Authentication token for a different iCloud user, do the following:
1.Run the atex.dmg file.
NOTE: If Elcomsoft Apple Token Extractor cannot be opened, see the detailed information in the Troubleshooting topic.
2.Copy the atex file from the mounted image to the folder where you want the file with authentication token to be saved.
3.Open the command-line Terminal.
4.Go to the directory where you saved the atex file.
5.To list all iCloud users, use the command sudo atex -l or sudo atex --iCloudUserList
sudo command is used to get root privileges for running the program.
6.Enter the password of the root user when prompted.
7.The list of all iCloud users will be displayed.
8.To get authentication token, run the command sudo atex --getToken -u <username> -p <password>
For example: sudo atex --getToken -u mary -p 1234
NOTE: Make sure that there is Internet connection on the computer where the token is extracted. Otherwise, only the token with limitations will be extracted.
9. The file "icloud_token_<timestamp>.plist" will be created in the directory from which atex was launched.
You will see the full path to the created file in the opened Terminal window.
10. The created "icloud_token_<timestamp>.plist" file contains the Authentication token of the selected iCloud user.
The "icloud_token_<timestamp>.plist" file created for a different iCloud user contains the following information:
macOS Version |
Contents |
macOS up to 10.12.5 |
▪Apple ID (apple_id) ▪Authentication token (auth_token) ▪Continuation token (ctoken) ▪Password to Apple ID - in some cases |
macOS 10.3 and higher |
▪Apple ID (apple_id) ▪Authentication token with limitations (auth_token_with_limitations) ▪Continuation token (ctoken) ▪Password to Apple ID - in some cases |
Parameters for running atex in the Terminal:
Parameter |
Meaning |
-h or [--help] |
Displays help message |
-l or [--iCloudUserList] |
Displays usernames of iCloud users |
--getToken -u <username> -p <password> |
Gets the authentication token for a specified user. Username and password should be entered without brackets. |
-u or [--username] |
Indicates a specified user. Username should be entered without brackets. |
-p or [--password] |
Indicates a password for a specified user. Password should be entered without brackets. |